Keeping your dryer vent clean is crucial for both efficiency and safety. A clogged vent not only reduces your dryer’s performance but also increases the risk of a fire. Lint buildup is a leading cause of dryer fires, making regular maintenance an essential task. In this guide, we’ll walk you through how to properly clean your dryer vent, ensuring your dryer works efficiently and safely.
Why Cleaning Your Dryer Vent is Important
A clean dryer vent offers several benefits:
- Improved efficiency: Your dryer will dry clothes faster with better airflow, saving energy and time.
- Longer appliance lifespan: Reduced strain on the dryer motor and heating element can help extend its life.
- Fire safety: Clearing out lint buildup reduces the risk of dryer fires, which are a common household hazard.
How Often Should You Clean the Dryer Vent?
It’s recommended to clean your dryer vent at least once a year, but if you notice any of the following signs, it may need cleaning more often:
- Clothes take longer than usual to dry.
- The dryer feels unusually hot to the touch.
- The laundry room becomes hotter when the dryer is running.
- You notice a burning smell during operation.
What You’ll Need
Before starting, gather these items:
- Dryer vent brush or cleaning kit
- Vacuum cleaner with a hose attachment
- Screwdriver
- Microfiber cloth
- Duct tape (optional)
- Dust mask (optional)
Step-by-Step Instructions
1. Unplug the Dryer
For safety, disconnect the dryer from the power source. If your dryer runs on gas, turn off the gas valve before proceeding.
2. Locate the Vent
The vent is typically located at the back of the dryer and leads to an exhaust duct that goes through the wall. Detach the dryer from the vent pipe by loosening the clamp or screws with a screwdriver.
3. Vacuum Lint from the Dryer
Using the vacuum’s hose attachment, clean around the vent opening and inside the dryer where the vent connects. This removes any loose lint around the connection point.
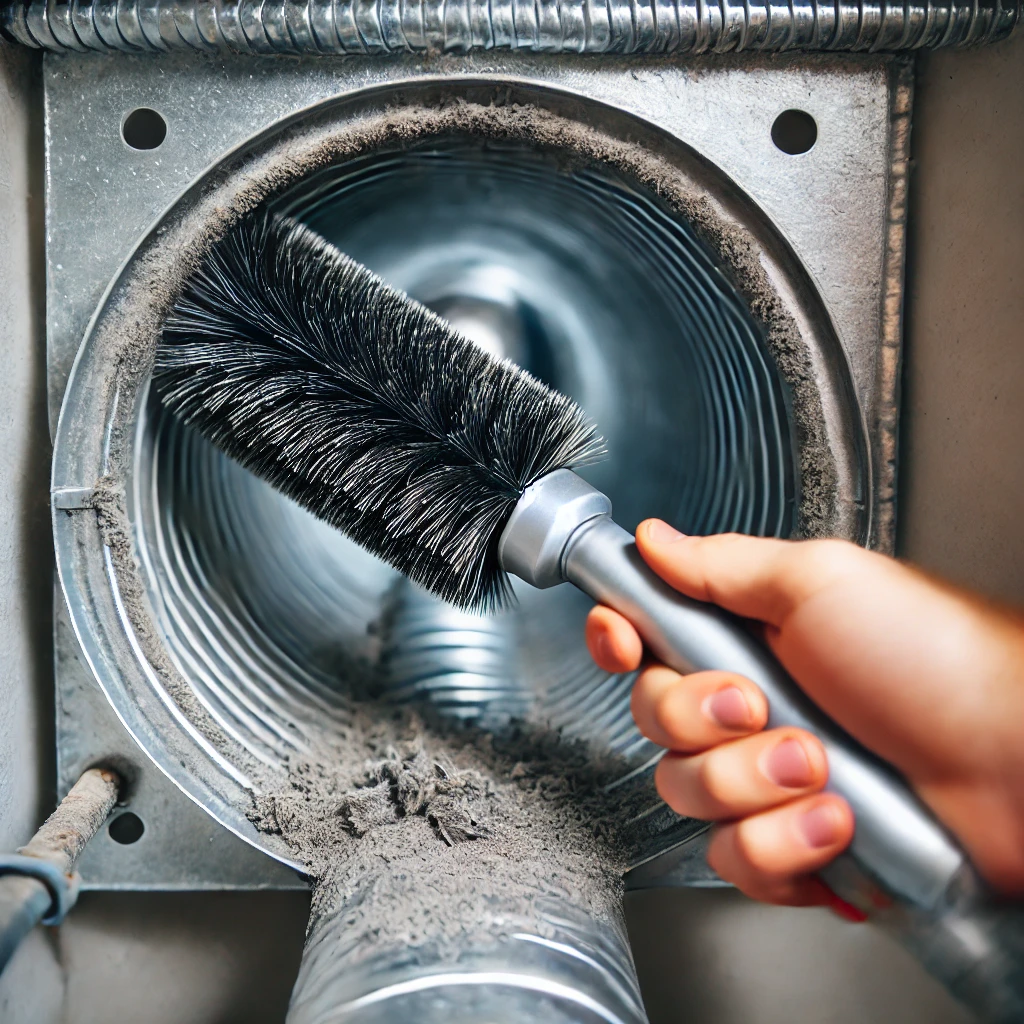
4. Clean the Vent Duct
Use a specialized dryer vent brush or cleaning kit to clean the duct itself. Insert the brush into the vent duct and rotate it while pushing it in and out to loosen lint buildup. Pull out the brush and clean off any lint before repeating this process along the length of the duct.
For long ducts, consider using an extendable brush or a dryer vent cleaning kit designed for longer reaches.
5. Check the Outside Vent
Go outside and locate the dryer vent opening. Remove any debris, lint, or obstructions that might block the vent. If you see a large buildup of lint, vacuum it out or use your brush to clean the vent cap and surrounding area. Ensure the vent cover opens freely when the dryer is running and is clear of obstructions.
6. Reassemble the Dryer Vent
Once the vent and duct are thoroughly cleaned, reconnect the vent pipe to the dryer using the clamp or screws you removed earlier. If the vent hose is damaged or too loose, consider replacing it or securing it with duct tape.
7. Wipe Down the Dryer
Before plugging in the dryer, wipe down the exterior and clean the lint trap inside the dryer with a microfiber cloth. It’s important to clean the lint trap after every use to prevent lint from clogging the vent system.
8. Test the Dryer
Plug the dryer back in and run it on a short cycle to ensure everything is reconnected properly and that air is flowing through the vent efficiently.
Tips for Maintaining a Clean Dryer Vent
- Clean the lint trap: Make it a habit to clean the lint screen after every load to reduce lint buildup.
- Check the vent regularly: Periodically inspect the dryer vent for blockages, especially if you notice drying issues.
- Shorten the vent duct: If your dryer duct is excessively long, consider shortening it to reduce the risk of lint accumulation and improve airflow.
- Opt for metal ducts: If you’re replacing the vent hose, choose a metal vent instead of plastic or vinyl, which are more prone to lint buildup and pose a fire hazard.
Conclusion
Cleaning your dryer vent is a simple yet essential task for maintaining the efficiency and safety of your dryer. A little effort to clear out lint can prevent energy waste, extend the life of your appliance, and significantly reduce fire risks. For professional assistance with more complex dryer vent cleaning or repairs, A-Repair is here to help. Our trusted and experienced team is ready to handle any Dryer Repair or maintenance needs.