
The Real Cost of Appliance Repair in 2026: A Comprehensive Guide for Homeowners
When a vital household machine breaks down, the initial shock is usually followed by a...
Read More →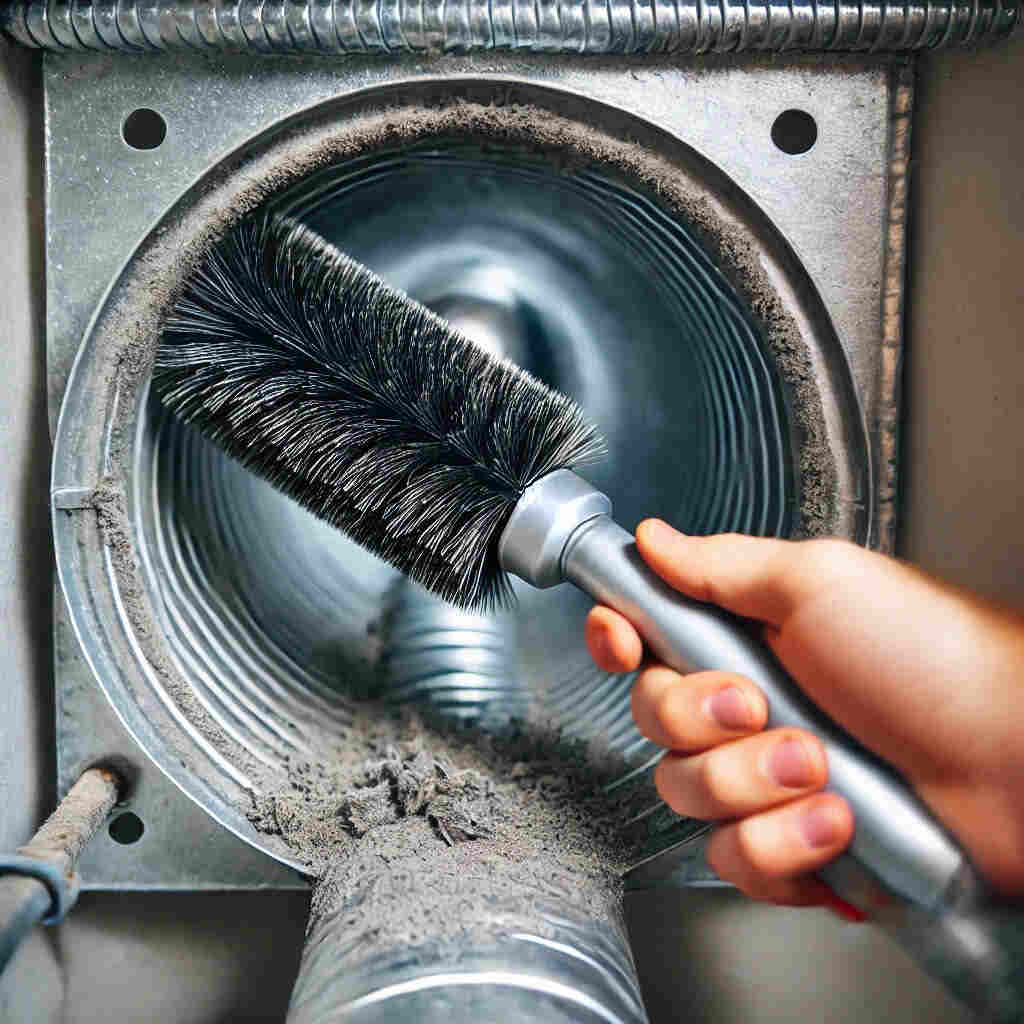
Dryer vent cleaning is important for viable and secure dryer procedures. A blocked vent decreases your dryer operation and increases the danger of a flame. In reality, hazardous fire due to the buildup of lint is the number one root of dryer fires and for this reason, you need to do standard maintenance. We go through the valid steps of dryer vent cleaning in this super easy guide to help your dryer run smoothly and protect your home.
A clean dryer vent has several advantages:
You should clean your dryer vent at least once a year, but if you see the signs below, you may need to clean it more frequently:

Before you start, gather these items:

As a precaution, disconnect the dryer from its power source. If you have a gas-powered dryer, be sure to shut the gas valve off before disconnecting.
The vent is usually found on the back of the dryer and leads into an exhaust duct that goes through the wall. To separate the dryer from the vent pipe, loosen the clamp or remove the screws with a screwdriver.
Use the attachment of a vacuum hose for cleaning and take out all the lint and dust particles that are in the vicinity of the vent opening in the dryer and around or at the vent where the duct connects. Doing so removes any loose lint around the connection point.

Use a suitable dryer vent brush or cleaning kit for the ductwork. Insert the brush into the vent duct and turn it while moving the brush in and out to break free the lint. Now and then extract the brush remove any lint, and repeat this process down the length of the duct.
If you have a long duct, you should consider an extendable brush or a dryer vent cleaning kit that is specifically made for a long reach.
Now, head outside and find the dryer vent outlet. Clean off any debris, lint, or obstructions that could be clogging the vent. In case there is a lot of lint buildup, vacuum it out and make sure the vent cap and the area around it are tidy. Make sure the vent cover opens freely when the dryer is on and there’s no blockage.
After cleaning the vent and duct you will need to reattach the vent pipe to the dryer using the clamp/screws you removed. If the vent hose is damaged or too loose, consider replacing it or using duct tape to secure it.
Use a microfiber cloth to wipe down the exterior of the dryer before plugging it back in, and clearing the lint screen inside the dryer. Make it a point to clean the lint trap after each cycle to prevent lint from clogging the vent system.
Replug the dryer and run a small cycle to make sure everything is connected properly and the vent is efficiently passing air through.
Don’t forget to clean the lint trap frequently: Always clean out the lint screen after every load, to ensure less lint build-up
Inspect the vent regularly: Take a look at the dryer vent from time to time to see if there are any obstructions, particularly if your clothing isn’t drying sufficiently
Shorten vent ducts: Consider shortening an overly long dryer duct to eliminate lint buildup and boost airflow
Pick metal ducts: If you are going to switch out the vent hose, use a metal vent rather than a plastic or vinyl vent, as the latter are more vulnerable to lint accumulation and therefore present more of a fire danger.
Cleaning the dryer vent is an easy but crucial chore for maintaining safety and efficiency with your dryer. By making a little effort to remove the lint, you can prevent energy wastefulness, prolong the life of your appliance, and lessen the chances of combustion by quite a hefty margin. If you have professional complexity in mind or wish to acquaint yourself with a more complex procedure, A-Repair is equipped to take care of all Dryer Repair needs. Our adept professionals are looking forward to and can be reached at 647-333-3350.
When a vital household machine breaks down, the initial shock is usually followed by a...
Read More →
As one of Toronto’s leading appliance repair providers, A-Repair understands how crucial properly functioning appliances...
Read More →
When your appliance breaks down, you’re faced with a choice: try fixing it yourself or...
Read More →
At A-Repair, we don’t just fix appliances—we help you make better choices when upgrading them....
Read More →Contact us right now!